The Zero-Drawer Desk System: How to Organize a Desk With No Drawers for Maximum Focus
It is six o'clock on a Tuesday evening. You have your laptop open, a stack of loose-leaf notebook paper, three highlighters, a half-empty water bottle, and a textbook that refuses to stay flat. Your workspace is a sleek, minimalist table with a brilliant flaw: it has zero drawers. There is no hidden bin to sweep your random erasers into, no sliding shelf for your keyboard, and nowhere to hide the charger cable that loops across your workspace like a metal snake. Every time you need to find a pen, you have to shuffle three notebooks and lift your laptop. When you want to focus, your eyes bounce across loose receipts, charging bricks, and index cards scattered directly under your nose. If you have ever wondered how to organize a desk with no drawers without letting your stuff spill onto the floor, you know that missing storage changes everything. A drawerless desk forces you to rethink how you hold your gear, because you cannot rely on out-of-sight-out-of-mind hiding spots. Instead of giving up your aesthetic or buying bulky plastic rolling carts that crowd your leg room, you can set up a streamlined surface system that keeps your tools within arm's reach while leaving your central area completely clear for active work, helping you effective study techniques with zero physical clutter in your way.
Understanding the Zero-Drawer Reality and Friction Points
Working on a minimalist flat-surface desk is visually appealing in furniture catalogs, but daily life introduces friction. Without drawers to catch stray items, clutter stays horizontal. Every single item you place on the surface immediately competes for your attention. To solve this, you need to understand why flat desks fail so quickly and how to establish boundaries for your items.

The Horizontal Accumulation Trap
The primary reason a drawerless desk turns into chaos is the horizontal accumulation trap. When a surface is flat and completely open, your brain treats it as a landing pad for whatever you are holding. You drop your phone there, place your headphones there, and set down a snack wrapper there. Because there is no vertical barrier or designated boundary, these objects migrate across your workspace until they cover your keyboard. To stop this cycle, you must create virtual boundaries using trays, desk mats, or designated landing zones. A desk mat, for instance, acts as a visual frame. When an item sits outside the mat, it is officially outside your active workspace and needs to be returned to its home. Establishing this rule prevents your work surface from turning into a catch-all tray for every random object you carry into the room.
The Vertical Solution Principle
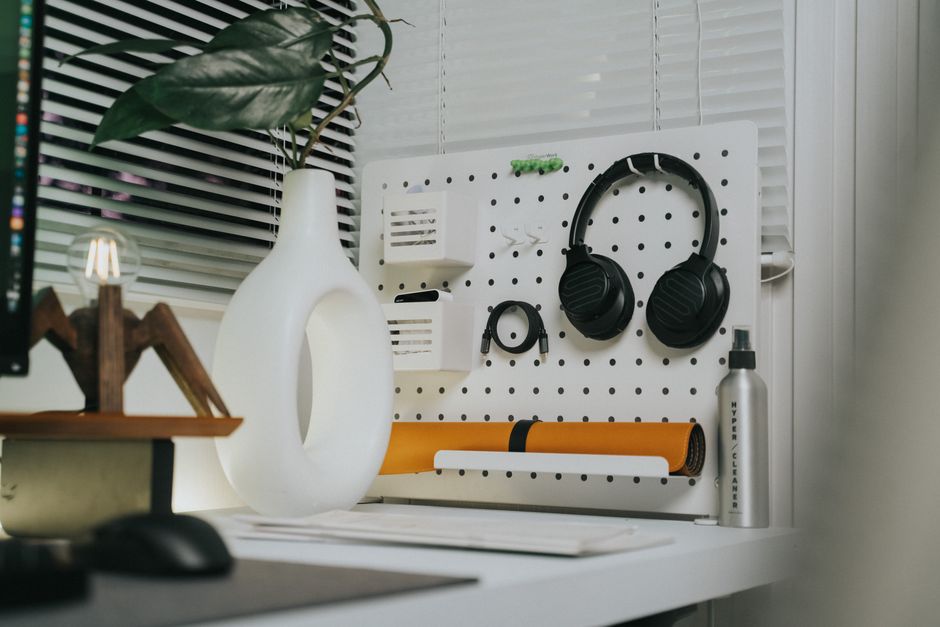
Since you lack under-desk storage drawers, your next best option is looking up and utilizing vertical space. Vertical organization transforms your desktop real estate by moving items off the horizontal plane. You can use wall-mounted pegboards, small tiered shelving units that sit on the back edge of the desk, or magnetic strips for metallic supplies. When your scissors, rulers, and sticky notes stand vertically in holders or hang on hooks, they take up a fraction of the surface area they would occupy if laid flat. This principle also applies to paper. Instead of leaving loose assignment sheets flat across your desk, use vertical file sorters or wall pockets. By shifting your storage upward, you keep your main work zone completely open for your arms, keyboard, and notebooks, which prevents physical crowding and helps maintain steady focus during long study sessions.
The Five-Step Zero-Drawer System
To keep a drawerless desk functional, you need a repeatable framework rather than a random cleanup session. This five-step system establishes clear limits, assigns specific homes, and keeps your surface clear of distractions.
Quick Tip: Treat your desktop like a stage: only bring out the props you need for the current act, and pack everything else away in an off-desk staging area.
Step 1: Conduct a Total Surface Audit
Start your organization process by clearing everything off the desk completely. Wipe down the surface so you begin with a clean slate. Pick up every single item from the pile and sort them into three strict categories: active daily tools, occasional reference items, and complete clutter or trash. Active daily tools include your laptop, your current notebook, a pen, and your charging cable. Occasional items include textbooks for classes you only have on alternate days, extra printer paper, and spare highlighters. Clutter includes expired study schedules, candy wrappers, and random receipts. Throw away the trash immediately. Place the occasional items in an off-desk location, such as a bookshelf or a nearby closet shelf. Only the active daily tools are allowed back onto your primary desk surface. This harsh sorting rule prevents you from cluttering your drawerless desk with items you do not need today.
Step 2: Establish Your Primary Action Zone
Your desk surface must be divided into specific zones based on frequency of use. The primary action zone is the semi-circle directly in front of you—the space your hands can reach comfortably without you having to lean or stretch. Place only your laptop, keyboard, mouse, and your single active notebook inside this zone. Nothing else belongs here. If an object does not get touched at least once every ten minutes while you are working, it does not deserve permanent residence in your primary action zone. By strictly protecting this central area, you ensure that your arms have plenty of room to write and type, and your eyes do not get distracted by a mountain of stationery sitting directly under your monitor.
Step 3: Deploy the Perimeter Containment Strategy
Since you have no drawers to hide your miscellaneous supplies, you must contain them around the perimeter of your desk. Use low-profile desktop trays, small ceramic bowls, or modular desk organizers placed strictly along the back corners or the extreme left and right edges of the table. This keeps your center completely open while giving items like paperclips, earbuds, and flash drives a specific home that will not wander off. For cords, use a weighted cable drop or adhesive clips attached to the back edge of the desk to prevent your chargers from sliding onto the floor every time you unplug your phone. Every item along the perimeter must have a designated container; loose items are not permitted to sit directly on the wood or laminate surface.
Zero-Drawer Desk Daily Reset Checklist:
- Clear all trash and loose paper wrappers from the surface.
- Return textbooks and notebooks from yesterday to their bookshelf storage.
- Wipe down the desk mat and primary action zone with a microfiber cloth.
- Wind up charging cables and secure them in their desktop clips.
- Check that only active daily tools remain within arm's reach.
- File loose assignment sheets into your vertical sorter.
With your perimeter containers secured and your primary action zone defined, you are ready to implement the final organizational layers that keep your workspace functional throughout the busiest weeks of the semester.
Step 4: Establish Vertical Paper and Tech Management
Paper and stray electronics are the two main culprits that turn a drawerless surface into a hazard zone. Because you cannot sweep them into a hidden drawer, every notebook, loose assignment sheet, and charging brick must have an intentional vertical home. Start by placing a wall-mounted file holder or a multi-tier vertical sorter against the wall directly behind your desk. Whenever you finish reading a chapter outline or a worksheet, slide it upright into the corresponding slot rather than letting it lie flat across your keyboard. For your tech gear, adopt a dock-and-store approach. Instead of leaving your laptop charger, phone cord, and wireless mouse receiver tangled on the tabletop, set up a small vertical charging station on a nearby bookshelf or use an under-desk cable tray that attaches magnetically or with adhesive clamps. When you finish using your devices for the day, coil the cords neatly and store them in that designated station. This keeps your main work surface completely free of tangled wires, helping you study without staring at your notes in frustration while tangled cables block your view. Keeping paper upright and cords off the central desk surface preserves your workspace integrity and protects your gear from accidental liquid spills.

Step 5: Maintain a Daily Reset Habit
The final step in managing a drawerless desk is consistency. Without physical drawers to hide accumulating clutter, your workspace will inevitably slip back into chaos if you neglect daily maintenance. Build a mandatory two-minute evening reset into your routine. At the end of every study session or workday, stand up and perform three quick actions: return all stray books to your bookshelf, toss any scrap paper or wrappers into the recycling bin, and wipe down your desk mat with a dry microfiber cloth. Doing this reset at the end of the day ensures that when you sit down the next morning, you are greeted by a clean slate rather than yesterday's mess. This small daily habit eliminates the need for massive weekend cleanup marathons and keeps your drawerless setup running smoothly week after week, ensuring your minimalist aesthetic remains functional and stress-free.
Your 15-Minute Reset
If your drawerless desk has already turned into a chaotic pile of papers, electronics, and random supplies, use this quick, sequenced 15-minute reset plan to restore order today without feeling overwhelmed:
- Minute 0–3 (The Trash Sweep): Grab a wastebasket and sweep all candy wrappers, expired notes, and useless scraps off your desk immediately.
- Minute 3–7 (The Relocation Phase): Pick up every book, mug, and item that does not belong on your primary desk surface and return them to their proper homes on bookshelves or in other rooms.
- Minute 7–11 (The Surface Wipe): Take a damp cloth or microfiber pad and clean your entire desktop surface, removing dust, eraser shavings, and sticky residue.
- Minute 11–15 (The Perimeter Setup): Arrange your essential daily tools—laptop, single notebook, and pen holder—back into your primary action zone and secure your charging cords in their designated clips.

Preventing the Same Backlog Next Week
Establishing an organized drawerless workspace is only half the battle; maintaining it requires deliberate boundaries that prevent clutter from creeping back in. To keep your minimalist desk functional over the long term, you need strict preventative rules regarding what enters your workspace.
The One-In, One-Out Rule for Desktop Accessories
Every time you bring a new item onto your drawerless desk—whether it is a new stapler, a pad of sticky notes, or a decorative plant—you must remove an existing item of equal physical footprint. Because your surface area is strictly limited and you have no hidden drawers to swallow surplus items, adding a new object without clearing out an old one creates an immediate overflow. If you buy a new desk calendar, the old calendar or a secondary notebook must leave the desk permanently. This simple substitution rule forces you to evaluate whether an item is genuinely necessary for your daily workflow or if it is merely aesthetic clutter taking up valuable space.
Establishing Strict Digital and Physical Separation
Many workspace backlogs happen because items meant for other parts of your life migrate onto your study surface. Treat your drawerless desk as a dedicated tool for active work, not a storage shelf for hobby supplies, laundry sorting, or makeup. If an item is not required for the specific task you are working on right now, it is barred from entering your primary action zone. When you finish working on a project, clear your workspace immediately before moving on to personal leisure or other tasks. By keeping a strict separation between your workspace and general household storage, you stop clutter at the front door and protect your desk from turning into a horizontal catch-all.
Key Takeaway: A drawerless desk is not a flaw in your room layout; it is a forced minimalist boundary that keeps your workspace lean, intentional, and entirely free of hidden clutter.
Frequently Asked Questions
Where do I put my pens and pencils if I have no drawers?
Use low-profile desktop containers, such as ceramic mugs, heavy glass jars, or modular desk trays, placed strictly along the back corners or extreme outer edges of your table. This keeps writing utensils within arm's reach while leaving the central work surface completely open for your keyboard and notebooks.
How can I stop my charging cables from sliding off the back of the desk?
Attach weighted cable drops, magnetic cord holders, or small adhesive clips to the back edge of your desk surface. When you unplug your phone or laptop, thread the end of the cord through the clip so it stays anchored in place rather than dropping onto the floor.
What is the best way to handle loose notes and worksheets on a flat desk?
Install a wall-mounted file organizer, a tiered desktop sorter, or hanging wall pockets directly above your workspace. Slide your papers vertically into these compartments immediately after use to keep them out of your horizontal work zone.
Can I use under-desk storage solutions if my table has no drawers?
Yes, you can install clamp-on keyboard trays, magnetic side baskets, or fabric hanging pouches that attach directly to the underside or side panels of your desk frame without requiring permanent drilling or built-in drawers.
This article offers general educational information, not medical advice. If distress is persistent or you feel unsafe, speak with a trusted adult, a school counselor or a qualified health professional.
Conclusion
Managing a desk with zero drawers comes down to rejecting horizontal clutter, embracing vertical storage, and protecting your primary action zone from migrating items. Instead of wishing for hidden storage or buying bulky furniture that crowds your room, you can make your flat surface work for you by setting strict boundaries and sticking to a daily reset habit. Pick one small improvement to make today—such as clearing off all non-essential items or setting up a vertical file sorter—and enjoy a clean, focused workspace. If you found this guide helpful, consider sharing this checklist with a friend or classmate who is also trying to figure out time management for students in a minimalist workspace.
Questions or feedback? Email us at organizeddailylife@gmail.com.
Comments